| 일 | 월 | 화 | 수 | 목 | 금 | 토 |
|---|---|---|---|---|---|---|
| 1 | 2 | 3 | 4 | 5 | 6 | 7 |
| 8 | 9 | 10 | 11 | 12 | 13 | 14 |
| 15 | 16 | 17 | 18 | 19 | 20 | 21 |
| 22 | 23 | 24 | 25 | 26 | 27 | 28 |
- 그럼에도불구하고
- cleancode
- react
- 코딩테스트
- 변수
- 반응형 페이지
- 자바문제풀이
- JavaScript
- react-router-dom
- node.js
- TypeScript
- java
- 자바
- JS
- 프론트엔드
- CSS
- redux
- 그럼에도 불구하고
- frontend
- 코드업
- max-width
- webpack
- @media
- git
- github
- HTML
- media query
- coding
- node
- Servlet
- Today
- Total
그럼에도 불구하고
[Responsive web] 플렉시블 박스 레이아웃이란? 본문
오늘은 플렉시블 박스 레이아웃에 대해 알아보자
[ 플렉시블 박스 레이아웃 ]
플렉시블 박스 레이아웃(flexible box layout)은 그리드 레이아웃을 기본으로 하고, 각 박스가 원하는 위치에 따라 배치하는 것이다. 이때 여유 공간이 생길 경우 너비나 높이를 적절하게 늘이거나 줄일 수 있다.
플렉시블 박스 레이아웃은 수평 방향이나 수직 방향 중에서 한쪽을 주축으로 정하고 박스를 배치한다.
예를 들어 아래의 그림처럼 주축을 수평으로 정하면 박스를 왼쪽에서부터 오른쪽으로 순서대로 배치하는데, 화면 너비를 넘어가면 수직으로 이동해서 다시 순서대로 배치한다.
( 플렉시블 박스 레이아웃을 플렉스(flex) 박스 레이아웃이라고도 한다. 아래부터는 플렉스 박스 레이아웃으로 지칭하겠다.)

플렉스 박스 레이아웃에 대해 더 자세히 알아보자
[ 플렉스 박스 레이아웃에서 사용하는 용어 ]
플렉스 박스 레이아웃은 그리드 레이아웃을 기본으로 해서 새로 등장한 개념이므로 알아 둬야 할 새로운 영어가 많다.
아래의 그림을 보자

1. 플렉스 컨테이너(부모 박스) : 플렉스 레이아웃을 적용할 대상을 묶는 요소
2. 플렉스 항목(자식 박스) : 플렉스 박스 레이아웃을 적용할 대상으로 1 ~ 6까지의 작은 박스
3. 주축(main axis) : 플렉스 컨테이너 안에서 플렉스 항목을 배치하는 기본 방향을 말한다. 기본적으로 왼쪽에서 오른쪽이며 수평 방향으로 배치한다. 플렉스 항목의 배치가 시작되는 위치를 '주축 시작점' , 끝나는 위치를 '주축 끝점'이라고 한다.
4. 교차축(cross axix) : 주축과 교차하는 방향을 말하며 기본적으로 위에서 아래로 배치한다. 플렉스 항목의 배치가 시작되는 위치를 '교차축 시작점', 끝나는 위치를 '교차축 끝점'이라고 한다.
[ 플렉스 박스 항목을 배치하는 속성 ]
플렉스 박스에는 플렉스 항목이 여러 개 있는데 일괄적으로 한꺼번에 배치할 수도 있고, 주축이나 교차축 기준으로 다양하게 배치할 수도 있다.
아래의 표를 보자.
| 종류 | 설명 |
| justify-content | 주축 방향의 정렬 방법 (가로) |
| align-items | 교차축 방향의 정렬 방법 (세로) |
| align-self | 교차축에 있는 개별 항목의 정렬 방법 |
| align-content | 교차축에서 여러 줄로 표시된 항목의 정렬 방법 |
[ 플렉스 컨테이너를 지정하는 display 속성 ]
플렉스 박스 레이아웃을 만들려면 먼저 웹 콘텐츠를 플렉스 컨테이너로 묶어 주어야 한다.
즉, 배치할 웹 요소가 있다면 그 요소를 감싸는 부모 요소를 만들고, 그 부모 요소를 플렉스 컨테이너로 만들어야 한다.
이때 특정 요소가 플렉스 컨테이너로 동작하려면 display 속성을 이용해 이 부분에 플렉스 박스 레이아웃을 적용하겠다고 지정한다.
플렉스 컨테이너를 지정하는 display의 속성값은 아래와 같다.
| 종류 | 설명 |
| flex | 컨테이너 안의 플렉스 항목을 블록 레벨 요소로 배치 |
| inline-flex | 컨테이너 안의 플렉스 항목을 인라인 레벨 요소로 배치 |
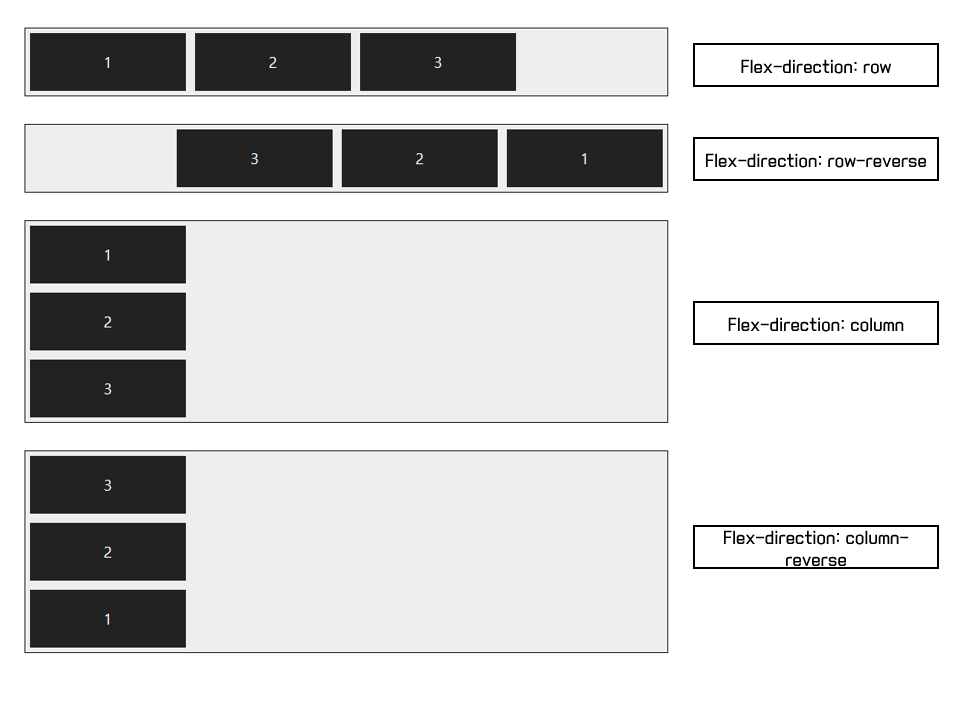
[ 플렉스 방향을 지정하는 flex-direction 속성 ]
플렉스 컨테이너 안에서 플렉스 항목을 배치하는 주축과 방향을 지정하는 속성이다.
사용할 수 있는 속성값은 아래와 같다.
| 종류 | 설명 |
| row | 주축을 가로로 지정하고 왼쪽에서 오른쪽으로 배치한다. (기본값) |
| row-reverse | 주축을 가로로 지정하고 반대로 오른쪽에서 왼쪽으로 배치한다. |
| column | 주축을 세로로 지정하고 위쪽에서 아래쪽으로 배치한다. |
| column-reverse | 주축을 세로로 지정하고 아래쪽에서 위쪽으로 배치한다. |
아래 예시를 보자
<!DOCTYPE html>
<html lang="ko">
<head>
  <meta charset="UTF-8">
  <title>플렉스 박스 레이아웃</title>
  <meta name="viewport" content="width=device-width, initial-scale=1">
  <style>
    .container {
      width:700px;
      display:flex; /* 플렉스 컨테이너 지정 */
      background-color:#eee;
      border:1px solid #222;
      margin-bottom:30px;
    }
    .box {
      padding:5px 45px;
      margin:5px;
	  	width:80px;
      background-color:#222;
    }
    #opt1{
      flex-direction: row;          /* 왼쪽에서 오른쪽으로 */
    }
    #opt2{
      flex-direction: row-reverse;   /* 오른쪽에서 왼쪽으로 */
    }
    #opt3{
      flex-direction: column;         /* 위에서 아래로 */
    }
    #opt4{
      flex-direction: column-reverse;  /* 아래에서 위로 */
    }
    p {
      color:#fff;
      text-align: center;
    }
  </style>
</head>
<body>
  <div class="container" id="opt1">
    <div class="box"><p>1</p></div>
    <div class="box"><p>2</p></div>
    <div class="box"><p>3</p></div>
  </div>
  <div class="container" id="opt2">
    <div class="box"><p>1</p></div>
    <div class="box"><p>2</p></div>
    <div class="box"><p>3</p></div>
  </div>
  <div class="container" id="opt3">
    <div class="box"><p>1</p></div>
    <div class="box"><p>2</p></div>
    <div class="box"><p>3</p></div>
   </div>
  <div class="container" id="opt4">
    <div class="box"><p>1</p></div>
    <div class="box"><p>2</p></div>
    <div class="box"><p>3</p></div>
  </div>
</body>
</html>
결과

[ 플렉스 항목의 줄을 바꾸는 flex-wrap 속성 ]
flex-wrap 속성은 플렉스 컨테이너 너비보다 많은 플렉스 항목이 있을 경우 줄을 바꿀지 여부를 지정한다.
속성값으로 wrap이나 wrap-reverse로 지정한 후 웹 브라우저 화면의 너비를 늘리거나 줄여 보면 플렉스 컨테이너의 너비에 따라 여러 줄로 표시되는 것을 볼 수 있다.
flex-wrap에서 사용할 수 있는 속성 값은 아래와 같다.
| 종류 | 설명 |
| nowrap | 플렉스 항목을 한 줄에 표시한다. (기본값) |
| wrap | 플렉스 항목을 여러 줄에 표시한다. |
| wrap-reverse | 플렉스 항목을 여러 줄에 표시하되, 시작점과 끝점이 바뀐다. |
아래 예시를 보자
<!DOCTYPE html>
<html lang="ko">
<head>
  <meta charset="UTF-8">
  <title>플렉스 박스 레이아웃</title>
  <meta name="viewport" content="width=device-width, initial-scale=1">
  <style>
    .container {
      display:flex;  /* 플렉스 컨테이너 지정 */
      background-color:#eee;
      border:1px solid #222;
      margin-bottom:30px;
    }
    .box {
      padding:5px 45px;
      margin:5px;
	  	width:80px;
      background-color:#222;
    }
    #opt1{
      flex-wrap: nowrap;           /* 한 줄에 표시 */
    }
    #opt2{
      flex-wrap: wrap;             /* 여러 줄에 표시 */
    }
    #opt3{
      flex-wrap: wrap-reverse;     /* 시작점과 끝점 바꿔 여러 줄에 표시 */
    }
    p {
      color:#fff;
      text-align: center;
    }
  </style>
</head>
<body>
  <div class="container" id="opt1">
    <div class="box"><p>1</p></div>
    <div class="box"><p>2</p></div>
    <div class="box"><p>3</p></div>
    <div class="box"><p>4</p></div>
    <div class="box"><p>5</p></div>
    <div class="box"><p>6</p></div>
  </div>
  <div class="container" id="opt2">
    <div class="box"><p>1</p></div>
    <div class="box"><p>2</p></div>
    <div class="box"><p>3</p></div>
    <div class="box"><p>4</p></div>
    <div class="box"><p>5</p></div>
    <div class="box"><p>6</p></div>
  </div>
  <div class="container" id="opt3">
    <div class="box"><p>1</p></div>
    <div class="box"><p>2</p></div>
    <div class="box"><p>3</p></div>
    <div class="box"><p>4</p></div>
    <div class="box"><p>5</p></div>
    <div class="box"><p>6</p></div>
   </div>
</body>
</html>
결과

※ flex-flow
flex-flow 속성을 사용하면 flex-direction 속성과 flex-wrap 속성을 한꺼번에 지정하여 플렉스 항목의 배치 방향을 결정하거나 줄을 바꿀 수 있다. 기본값은 row nowrap이다.
예시
<style>
	.container1 { flex-flow : row wrap};
	.container2 { flex-flow : row nowrap};
</style>
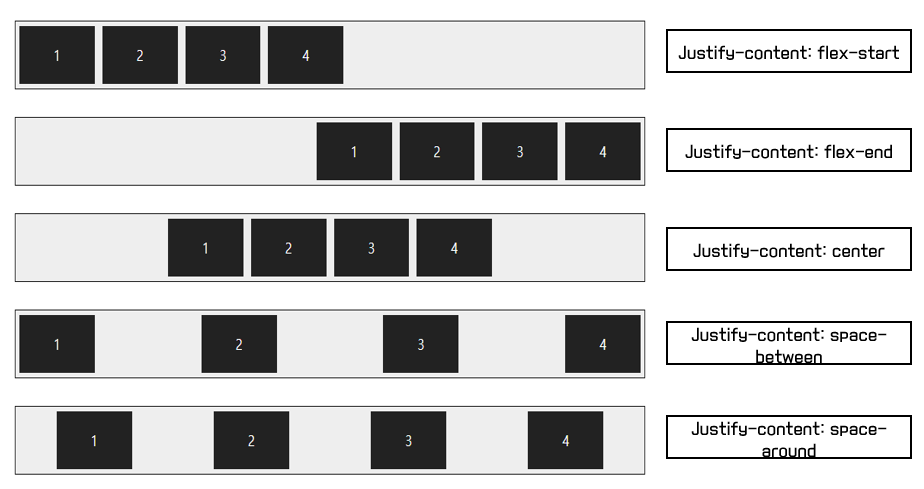
[ 주축 정렬 방법을 지정하는 justify-content 속성 ]
justify-content 속성은 주축에서 플렉스 항목 간의 정렬 방법을 지정한다.
사용할 수 있는 속성 값은 아래와 같다.
| 종류 | 속성 |
| flex-start | 주축의 시작점에 맞춰 배치한다. |
| flex-end | 주축의 끝점에 맞춰 배치한다. |
| center | 주축의 중앙에 맞춰 배치한다. |
| space-between | 첫 번째 항목과 끝 항목을 주축의 시작점과 끝점에 배치한 후 나머지 항목은 그사 사이에 같은 간격으로 배치한다. |
| space-around | 모든 항목을 주축에 같은 간격으로 배치한다. |
아래 예시를 보자
<!DOCTYPE html>
<html lang="ko">
<head>
  <meta charset="UTF-8">
  <title>플렉스 박스 레이아웃</title>
  <meta name="viewport" content="width=device-width, initial-scale=1">
  <style>
    .container {
      display:flex;  /* 플렉스 컨테이너 지정 */
      background-color:#eee;
      border:1px solid #222;
      margin-bottom:30px;
    }
    #opt1{
      justify-content: flex-start;    /* 주축 시작점 기준으로 배치 */
    }
    #opt2{
      justify-content: flex-end;      /* 주축 끝점 기준으로 배치 */
    }
    #opt3{
      justify-content: center;       /* 주축 중앙 기준으로 배치 */
    }
    #opt4{
      justify-content: space-between;      /* 시작점과 끝점 배치 후 중간 항목은 같은 간격으로 배치 */
    }
    #opt5{
      justify-content: space-around;       /* 전체 항목을 같은 간격으로 배치 */
    }
    .box {
      padding:5px 45px;
      margin:5px;
      background-color:#222;
    }
    p {
      color:#fff;
      text-align: center;
    }
  </style>
</head>
<body>
  <div class="container" id="opt1">
    <div class="box"><p>1</p></div>
    <div class="box"><p>2</p></div>
    <div class="box"><p>3</p></div>
    <div class="box"><p>4</p></div>
  </div>
  <div class="container" id="opt2">
    <div class="box"><p>1</p></div>
    <div class="box"><p>2</p></div>
    <div class="box"><p>3</p></div>
    <div class="box"><p>4</p></div>
  </div>
  <div class="container"  id="opt3">
    <div class="box"><p>1</p></div>
    <div class="box"><p>2</p></div>
    <div class="box"><p>3</p></div>
    <div class="box"><p>4</p></div>
   </div>
  <div class="container" id="opt4">
    <div class="box"><p>1</p></div>
    <div class="box"><p>2</p></div>
    <div class="box"><p>3</p></div>
    <div class="box"><p>4</p></div>
  </div>
  <div class="container" id="opt5">
    <div class="box"><p>1</p></div>
    <div class="box"><p>2</p></div>
    <div class="box"><p>3</p></div>
    <div class="box"><p>4</p></div>
  </div>
</body>
</html>
결과

[ 교차축 정렬 방법을 지정하는 align-items 속성 ]
justify-content 속성이 주축에서 항목을 정렬하는 방법이라면, align-items 속성은 교차축을 기준으로 플렉스 항목을 정렬한다.
사용할 수 있는 속성값은 아래와 같다.
| 종류 | 설명 |
| flex-start | 교차축의 시작점에 맞춰 배치한다. |
| flex-end | 교차축의 끝점에 맞춰 배치한다. |
| center | 교차축의 중앙에 배치한다. |
| baseline | 교차축의 문자 기준선에 맞춰 배치한다. |
| stretch | 플렉스 항목을 늘려 교차축에 가득 차게 배치한다. |
아래 예시를 보자
<!DOCTYPE html>
<html lang="ko">
<head>
  <meta charset="UTF-8">
  <title>플렉스 박스 레이아웃</title>
  <meta name="viewport" content="width=device-width, initial-scale=1">
  <style>
    .container {
      width:100%;
      height:150px;
      display:flex;
      background-color:#eee;
      border:1px solid #222;
      margin-bottom:20px;
    }
    #opt1{
      align-items: flex-start;   /* 교차축 시작점 기준으로 배치 */
    }
    #opt2{
      align-items: flex-end;     /* 교차축 끝점 기준으로 배치 */
    }
    #opt3{
      align-items: center;       /* 교차축 중앙 기준으로 배치 */
    }
    #opt4{
      align-items: baseline;      /* 문자 기준선에 맞춰 배치 */
    }
    #opt5{
      align-items: stretch;       /* 항목을 늘려 교차축에 가득차게 배치 */
    }
    .box {
      padding:5px 45px;
      margin:5px;
      background-color:#222;
    }
    p {
      color:#fff;
      text-align: center;
    }
  </style>
</head>
<body>
  <div class="container" id="opt1">
    <div class="box"><p>1</p></div>
    <div class="box"><p>2</p></div>
    <div class="box"><p>3</p></div>
    <div class="box"><p>4</p></div>
  </div>
  <div class="container" id="opt2">
    <div class="box"><p>1</p></div>
    <div class="box"><p>2</p></div>
    <div class="box"><p>3</p></div>
    <div class="box"><p>4</p></div>
  </div>
  <div class="container" id="opt3">
    <div class="box"><p>1</p></div>
    <div class="box"><p>2</p></div>
    <div class="box"><p>3</p></div>
    <div class="box"><p>4</p></div>
  </div>
  <div class="container" id="opt4">
    <div class="box"><p>1</p></div>
    <div class="box"><p style="font-size:14px;">2</p></div>
    <div class="box"><p style="font-size:25px;">3</p></div>
    <div class="box"><p style="font-size:10px">4</p></div>
  </div>
  <div class="container" id="opt5">
    <div class="box"><p>1</p></div>
    <div class="box"><p>2</p></div>
    <div class="box"><p>3</p></div>
    <div class="box"><p>4</p></div>
  </div>
</body>
</html>
결과

[ 특정 항목만 정렬 방법을 지정하는 align-self 속성 ]
align-item 속성은 교차축을 기준으로 플렉스 항목의 정렬 방법을 결정하지만 그중에서 특정 항목만 지정하고 싶다면 align-self 속성을 사용하면 된다.
속성값은 align-item의 속성값과 동일하다.
[ 여러 줄일 때 교차축 정렬 방법을 지정하는 align-content 속성 ]
주축에서 줄 바꿈이 생겨서 플렉스 항목을 여러 줄로 표시할 때 align-content 속성을 사용하면 교차축에서 플렉스 항목 간의 간격을 지정할 수 있다.
| 종류 | 설명 |
| flex-start | 교차축의 시작점에 맞춰 배치한다. |
| flex-end | 교차축의 끝점에 맞춰 배치한다. |
| center | 교차축의 중앙에 맞춰 배치한다. |
| space-between | 첫 번째 항목과 끝 항목을 교차축의 시작점과 끝점에 맞추고 나머지 항목은 그 사이에 같은 간격으로 배치한다. |
| space-around | 모든 항목을 교차축에 같은 간격으로 배치한다. |
| stretch | 플렉스 항목을 늘려서 교차축에 가득 차게 배치한다. |
아래 예시를 보자
<!DOCTYPE html>
<html lang="ko">
<head>
  <meta charset="UTF-8">
  <title>플렉스 박스 레이아웃</title>
  <meta name="viewport" content="width=device-width, initial-scale=1">
  <style>
    .container {
      float:left;
      width:200px;
      height:150px;
      display:flex;          /* 플렉스 컨테이너 지정 */
      flex-flow: row wrap;   /* 왼쪽에서 오른쪽, 여러 줄 표시 */
      border:1px solid #222;
      background-color:#eee;
      margin:30px;
    }
    #opt1{
      align-content: flex-start;    /* 교차축 시작점 기준 */
    }
    #opt2{
      align-content: flex-end;       /* 교차축 끝점 기준 */
    }
    #opt3{
      align-content: center;         /* 교차축 중앙 기준 */
    }
    #opt4{
      align-content: space-between;     /* 시작점과 끝점 배치 후 중간 항목은 같은 간격으로 배치 */
    }
    #opt5{
      align-content: space-around;       /* 전체 항목을 같은 간격으로 배치 */
    }
    #opt6{
      align-content: stretch;             /* 항목을 늘려 교차축에 가득 차게 배치 */
    }
    .box {
      width:80px;
      background-color:#222;
      border:1px dotted #e9e9e9;
    }
    p {
      color:#fff;
      text-align: center;
    }
  </style>
</head>
<body>
  <div class="container" id="opt1">
    <div class="box"><p>1</p></div>
    <div class="box"><p>2</p></div>
    <div class="box"><p>3</p></div>
    <div class="box"><p>4</p></div>
  </div>
  <div class="container" id="opt2">
    <div class="box"><p>1</p></div>
    <div class="box"><p>2</p></div>
    <div class="box"><p>3</p></div>
    <div class="box"><p>4</p></div>
  </div>
  <div class="container" id="opt3">
    <div class="box"><p>1</p></div>
    <div class="box"><p>2</p></div>
    <div class="box"><p>3</p></div>
    <div class="box"><p>4</p></div>
   </div>
  <div class="container" id="opt4">
    <div class="box"><p>1</p></div>
    <div class="box"><p>2</p></div>
    <div class="box"><p>3</p></div>
    <div class="box"><p>4</p></div>
  </div>
  <div class="container" id="opt5">
    <div class="box"><p>1</p></div>
    <div class="box"><p>2</p></div>
    <div class="box"><p>3</p></div>
    <div class="box"><p>4</p></div>
  </div>
  <div class="container" id="opt6">
    <div class="box"><p>1</p></div>
    <div class="box"><p>2</p></div>
    <div class="box"><p>3</p></div>
    <div class="box"><p>4</p></div>
  </div>
</body>
</html>
결과

'HTML, CSS > Responsive web' 카테고리의 다른 글
| [Responsive web] flexbox와 main axis, class axis에 대해 알아보자 (0) | 2023.01.09 |
|---|---|
| [Responsive web] CSS 그리드 레이아웃이란? (0) | 2022.12.23 |
| [Responsive web] 그리드 레이아웃이란? (0) | 2022.12.22 |
| [Responsive web] 반응형 웹 알아보기 (4) | 2022.12.22 |
| [Responsive web] break point / 반응형 페이지 만들기 (0) | 2022.11.13 |


